Your cart is currently empty!
Planting Bare Root Peonies

Bare root peonies do best when planted at the right time of year. Therefore, fall is the best time to harvest and plant bare root peonies. Our bare root peonies are inspected by The USDA and the Missouri Department of Agriculture prior to shipping and certified that the plants meet certain standards, to be free of disease and pests.
PEONY ROOTS
We prepare generous-sized peony divisions, including many rare and novel peonies and mail out the largest roots with as many “eyes” as possible. Peony starts are cut from plants that are 4 years old and would have flowered here in the upcoming year. For this reason, these divisions are programed to flower at your location in the first year. However, if these roots are subjected to adverse conditions during transport, delayed planting or an unfavorable growing environment, it may take a few years to see a flower and if handled or treated improperly may even result in death. Peony roots are perishable and cannot be stored for an extended period. The root divisions or “peony starts” are prepared by us to meet and often exceed the industry standard Grade 1 (3-5 eyes) in general. Some rare and novel peonies may not conform to these industry Grade 1 standards in regards to eye count or size and are identified in our catalog. Due to the varying degrees of climate conditions, we encourage contacting your local university extension, garden club or ask locally for additional planting and growing tips addressing your specific local requirements.
PLANTING SITE
Peonies require fertile soil and good moisture to perform well. Full sun supports best plant growth, but flower durability may be prolonged with light midday shade and shelter from strong winds. Do not allow lawn grass to grow over the root zone of your new peonies, at least not until after the bush matures and becomes large enough to successfully compete with the grass.


PLANTING
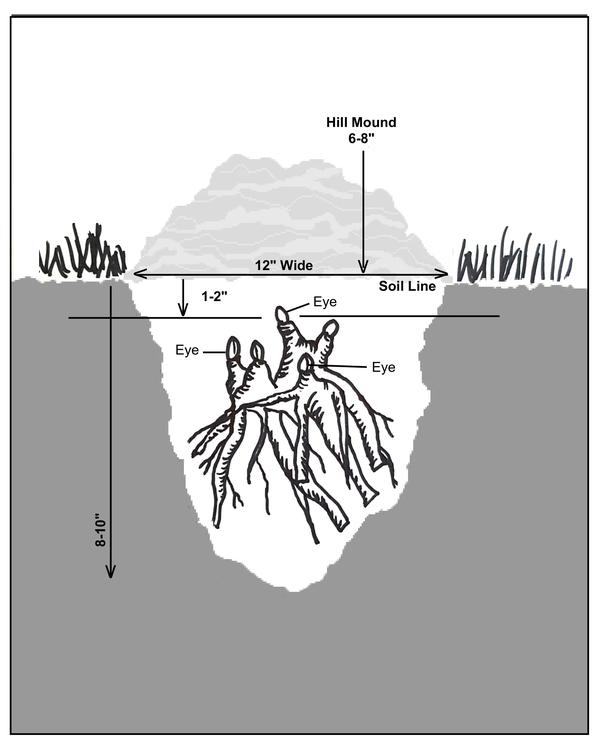
See the diagram above
The peony “starts” that are sent should be planted promptly upon receipt. Our roots are packed in moist sphagnum peat moss for protection during transport. Dig a hole in moist soil deep enough and wide enough to accommodate the root size, so the bottom of the shoot buds, also called “eyes”, can be placed two (2) inches under the surface soil line and roots pointed outward/downward. For most garden soils, adding 2 tablespoons of pelleted mineral (10-10-10) fertilizer is sufficient. In poor soil conditions and very sandy soil, use a little more. Fresh compost, especially compost containing manure may burn your roots; alternatively use well aged compost. Mix the backfill soil and any compost well before incorporating with the backfill. Lightly pack the soil around each root so the division will not settle too deep when watered. Hill up your soil over the plant for the first winter to reduce the chance of frost heaving and prevent standing water. This mound will erode over time or can be removed gently the following spring when your roots start to break dormancy. Mark each plant with a durable plant label, such as a stainless-steel marker or weather resistant plastic tag, to ensure proper identification the following spring.
